Keep them coming man… I like reading and looking at your work!
5 Likes
I think your threads are brilliant. If someone is looking to forums to help them rebuild an old bike, your threads will be like striking gold ![]()
6 Likes
Keep up the good work @Iron
Always interesting and entertaining. ![]()
4 Likes
You simply can’t (IMHO) put too much information about this type of stuff on here - the fact that it’s entertaining AND informative is a bonus, to my way of thinking.
Keep it coming. Over.
4 Likes
Thanks gang ![]() I’ll carry on, ta…
I’ll carry on, ta…
Moving on to the siezed in rusty studs - which could always turn out to be a disaster if any of them break.
I would normally use the two nuts method on the stud. The top nut acts as a lock nut to allow the bottom nut to be turned to take the stud out.
I couldn’t get a nut onto these studs as they are rusted quite badly…

So resort to the gripping in the vice while turning the item they are bolted into

As there’s not much room only about a quarter turn can be made until it needs to be moved in the vice but slowly does it. Looks like there’s been quite some interaction welding between the alluminium and the steel. These were pretty tough to get out.

There was a broken stud in the slider that originally held the mudguard but that came out using the same method

Went round both sliders and removed them all


Even the normally well’ard studs for the caliper came out without a hitch. I thought I had a broken stud in the bottom of the slider for the spindle but it turned out that one had been removed previously - the hole was filled with cobweb, so that was handy Harry…

Then the dreaded drain plug screw. I couldn’t turn them but resorting to one of those Jap impact screwdrivers they came straight out. These screwdrivers are a bit expensive but worth it when you need them.

Removing the fork seals. Take out the circlip…

and use an oil seal remover tool to lever them out. These are a really cheap tool and save trying to use a screwdriver, slipping and damaging the workpiece or sticking it straight into your hand. Good thing to have in the toolbox.

Most bits of forks all dismantled ready for inspection, cleaning, making pretty and compiling a long list of parts for order and rebuild ![]()
9 Likes
Do you put anything on the steel studs prior to fitting into the aluminium @Iron ?
In my former life as a gun fitter we used Barium Chromate paste to stop the reaction.
4 Likes
Never too long and never boring!
2 Likes
No, I haven’t ever used that. I’ve only ever smeared on some copper grease anti sieze. The reaction between the ally and steel causes some real issues on these bikes that are getting on. I’ve even had cylinder heads really very securely stuck onto the shafts of studs that have taken some hammering surgery to free up.
I’ve not had a bike long enough to see if the copper grease will help in future required rebuilds. I’ve not put anything onto studs that screw in though as I figure the Triumph designers knew a lot more than I ever will and I don’t want them unscrewing.
God knows how the modern materials used in bikes these days will cope in years to come.
I’ve looked up Barium Chromate but it looks to be a powder that needs dissolving in acid - I must have the wrong stuff - can you buy it without a Chemistry degree?
2 Likes
This might be the stuff
Duralac
2 Likes
Thanks for that.
I’ve had a read up on it and looks to be just the stuff for both shanks and also steel threads into alloy.
So have ordered some and will use on the rebuild. ![]()
3 Likes
That’s it Col but we used some other brand which is probably banned now😀
3 Likes
Right e ho, onto the wheels

A little cute Veglia speedo drive, I’ve not seen these before

Separate the wheel from the disk brake and sprocket by wrestling out the four long bolts

Phew, lots of rust, had to use a punch to get the bolts all the way out. I couldn’t just pull them out
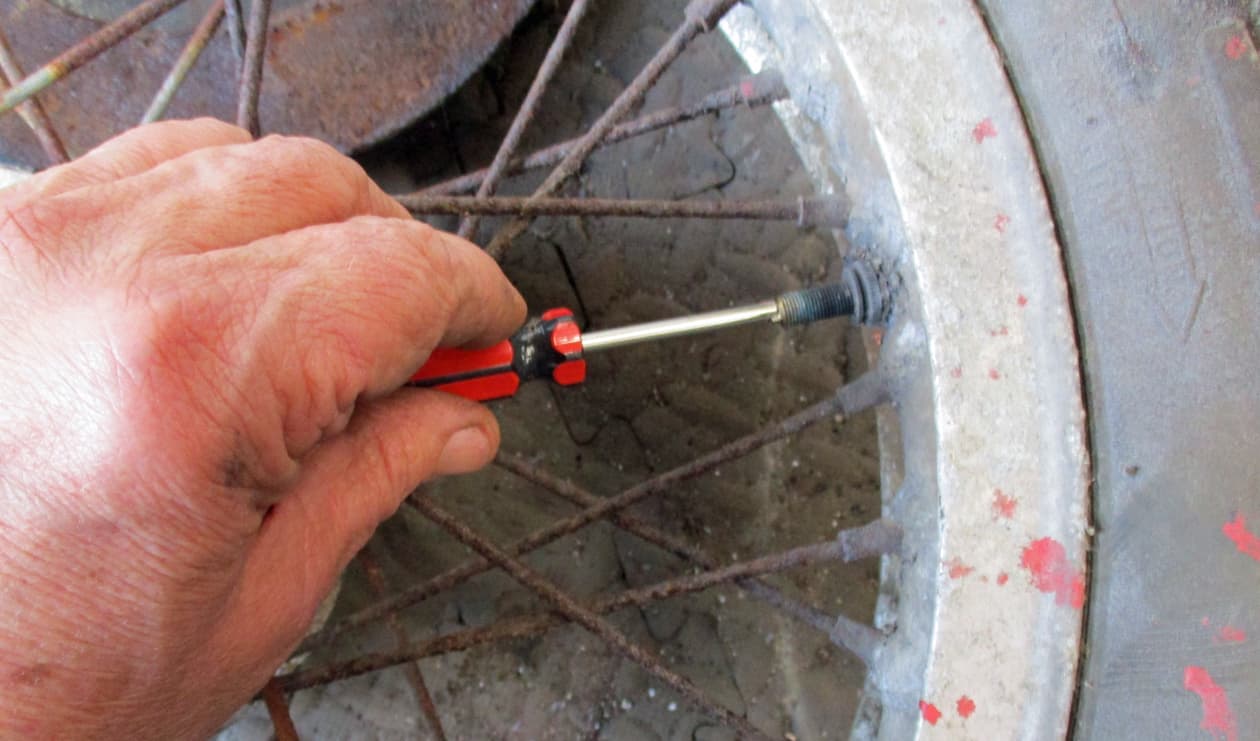

Another little handy cheap tool to take the valve stem out. The air (surprised there was any in it) stank terrible so I opened the door and went to make a cuppa

Put the whole lot in the vice to break the bead. Not really a bead on these tyres but the slippy stuff to put the tyres on had turned hard and stuck the tyre to the rim

The original Akront sticker still on the rim

The inner tube didn’t look bad at all and the tyre was a right bugger to prise off.

And the wheel all exposed in it’s awfulness ![]()
6 Likes
Thanks for the tip! Filed away for future use ![]()
3 Likes
Who needs Haynes manuals when you can have a real hands on mechanic showing you every step of the way, and with funny anecdotes too. Haynes never tell you how to take parts off, just say remove. Years ago I spent ages trying to undo a back brake lever nut on a BSA A65 that turned out to be a left hand thread so I need simple instructions. Lol
Cheers Iron, another great read.
6 Likes
Gotta take the old hard tyre off the front wheel as well but to help with that the wheel needs to lay flat on the floor. So the spindle has to come out.

Take the four bolts out holding the disc. Again rust was holding everything so a bit more effort required

Work on the left/disc side of the wheel where the nut is. This one needed a bit of a wipe first.

Hold the spindle in the vice so it doesn’t turn and lean on a large spanner/adjustable to get the nut out. It’s a right hand thread (normal anti clockwise to come out). Sometimes an easy out, most times a bit of extra force is required so just use the force, easy.

Exposed is the collar that again is right hand thread. I haven’t got the special tool so use a punch to turn…

and get it out. Which exposes the wheel bearing.

Then turn the wheel over and bash the spindle out. The spindle has a lip that will push on the bearing and bring it out as you hammer.

Get the wheel down onto the floor and continue bashing…eeergh. S’ok it’s just old grease and water

Needed a rod to bash the last bit of rusty ended spindle out. Hmmm, may be needing a new spindle.

Put it back in the vice and bash the spindle out of the bearing. Bin the bearings, even if they look and feel good. They are cheap items to replace. If your bike dealer has bearings available but they are expensive just find the correct size and order from a manufacturer (not in India or China), they’ll be a lot cheaper

Put the wheel back up onto the vice and remove the circlip from the remaining bearing side

Turn the wheel over and use the spindle the other way round to hammer into the remaining bearing

and knock it and the dust cover out

Pull the upper dust cover out with the lip as the spindle comes back out

And, eeeek, there’s the last bearing

Here’s all the bits laid out as they are from the left to right side of the bike. So, now the wheel can be laid flat on the floor to get the blimmin inner tube and tyre off…
9 Likes
Wheels, yes the wheels

Despoking is easy as long as you don’t want to keep the spokes. Trusty disc cutter is just the job
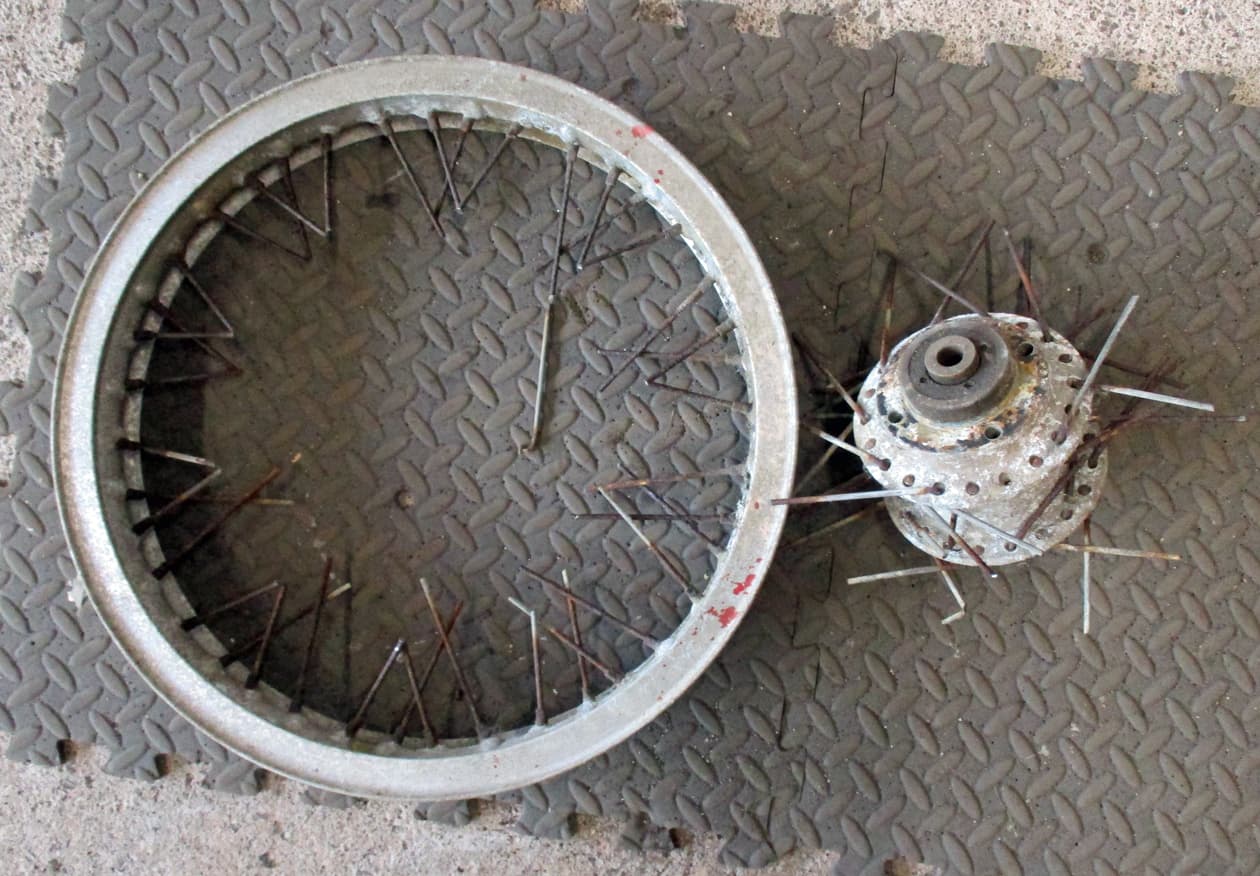
The spokes make a sort of bang as they are cut. I suppose because they are under tension. Wears the cutting wheel down really quickly but only takes a minute

Fiddle the cut spokes out of the hub

The rear hub separates with a tap from the rubber mallet, just joined by corrosion.

The central spacer just falls out, giving access to the bearings.

Take out the lock ring over the left side bearing. This is left hand thread (clockwise to turn out)

And knock the bearing out with a suitable drift

The bearing drops out still attached around the spacer

Bash those apart

Knock out the right side spacer

and then the bearing.

and the dust cover. This’ll just hammer out with a punch but incase you want to keep it, use a proper basher outa thing

Separate the centre part of the hub by a whack from the rubber mallet

And there’s the back hub all apart awaiting a bit of a wash and brush up ![]()

Take the spokes out of the rims and all the bits ready for trying to de- corrode

And to finish off the dismantling. Knock all the brass bushes and arm pivot sleeves out of the swing arm for replacement.
Now to compose a very long list of part numbers. ![]()
![]()
Over… ![]()
14 Likes
I’d be very interested to know if you’ll be showing us wheel building Mr Iron ? The reason i’m particularly interested is that I have a 1971 CB250 and the rims along with the mudguards are the worst bits left to do. I could use the rims “as is” but they are deeply pitted but i’ve got them quite shiny and i’m sure their strength is not compromised.
3 Likes
The plan is to take all the alloy parts (incl engine casings) to a vapour blaster. They should be ok, if not then I’ll buy new rims along with new stainless spokes. I’ll then rebuild the wheels and show the lacing and balancing.
Can’t say when it’ll be though, so as long as you aren’t in any rush. But it’s pretty easy to be honest.
8 Likes
As above, I’d like to get everything apart and ready for vapour blasting so cracking on before it gets too cold in the garage.

The engine’s already apart as the PO was rebuilding before he got poorly. I think it was time for a rebuild once I had a look in the sludge trap. For 13,500 miles there was a lot of sludge in there so I think the services/oil changes were few and far between. There’s no oil filter on these bikes (other than the sieves in the sump plug and bottom of the oil tank) and they were designed for the heavier oil to leave the crud behind in the centrifugal action of the crankshaft before it got into the big ends. It’s important to change the oil frequently and clean out the bottom of the oil tank.

Engine out of the stand, casings apart and the main shaft oil seal and circlip out. All bearings will need replacing if going to any form of blasting. The material used for blasting (even vapour) will get everywhere and foul up any bearings. So they all should come out.

Apply fire and whack stoutly with a middle sized hammer using a suitably sized drift. Crankshaft main bearing out. This is the easiest to get out and gets me into the feel of hitting something I would normally be fairly delicate with (if that makes sense) ![]()
![]()
Note on bearings for those who are interested
These bearings come in several tolerances. That is how tightly they fit together in themselves, not how tight they fit into the hole or over the shaft.
The lettering for their tolerance is confusing but the easiest way is as follows (this is how I’ve written it in my parts book so I understand it)
C2 bearings are the tightest tolerance
then
CN bearings which are ‘normal’ size and are looser than C2
then
C3 bearings which are looser than CN
then
C4 bearings which are the loosest of all
Each model of Triumphs unit engined bikes take different toleranced bearings on the crankshaft. Obviously the more powerful the bike the closer the tolerance needed to be to stop the crankshaft ‘knocking’ and/or mashing up the bearing. Check the right one is ordered for your build.

Gearbox mainshaft bearing. Again plenty of fire to the casing before bashing. These are quite expensive but they are always bolloxed up removing them.

Small blind ended needle lay shaft bearing whacks out fairly easily. But are really easy to damage when putting a new one in.

And now for the main event. The so called three part main bearing. Again quite an expensive bearing. And a complete bugger to get the race out.

The centre knocks out easily (this would normally come out with the crankshaft as this is how they were designed otherwise separating the crankcase halves is a bit of an arse)

To get the race out (the part the rollers run on) requires a special tool. Or put the whole casing into the oven on 300 degrees for half an hour and slam the casing down on something hard and it should pop right out - yeah right. And get a slap from the Admin Staff for stinking up the oven.

The tool is like a rawlbolt and tightens up onto the race. I’ve never had one of these work without sticking it into the race with superglue. So apply superglue and tighten the tool up as much as is possible, like really really hard. Then apply fire for 5 or 6 minutes around the tool to the casing on both sides, bash with a big hammer and…

Hooray, another one bites the dust. (By the way, don’t pick it up in your joy with no gloves on - bastard!)

Time to clean the superglue and rust off of the tool so it’s clean for next time.

All the bearings and bits out of the casings.
9 Likes
Who would have thought a write up about bearing removal could be so entertaining ![]() Just brilliant!
Just brilliant!
4 Likes