Wotcha Joe,
I’m pretty sure the standard set up for Mk2s is slot #1 (top slot) which is the leanest. If you have new carbs then the needles will already be in the leanest groove.
I assume you have Amals Mk2s but some T140EX had Bing carbs (BMWs had those I think). Maybe the Bings were just on export bikes.
It’s hard to tell, due to the rubbish corn made ethanol content, whether engines are running rich or lean just by looking at the spark plugs. To really know then a plug chop test is the way to go but it’s extreme and a faff to do.
The best solution is to set the carbs up as per the book and run like that. New carbs should be good, old ones should have main jet replaced as that’s the bit that wears, it’s hardly ever the needles. A little richness wont hurt as the engine will run cooler, ethanol fuels run lean and hot, we don’t like lean and hot in our engines as it leads to detonation.
Iron
Thanks for the quick reply. I shall have to check when get round to it. Have a nice Christmas and new year.
Joe
Lacing of da wheels ![]()
really confusing to get your head round it but really easy once figured out.
Before you go taking your wheels apart make sure you take lots of photos so you know how the spokes lay, their pattern and where the inner and outer ones run.
I’ve a few fully built wheels hanging around so I can look at those - you may not - so get the camera out and take loads of pictures.
The front wheel first as the rim’s centreline aligns with the hub’s centreline. They are offset in the rear wheel.

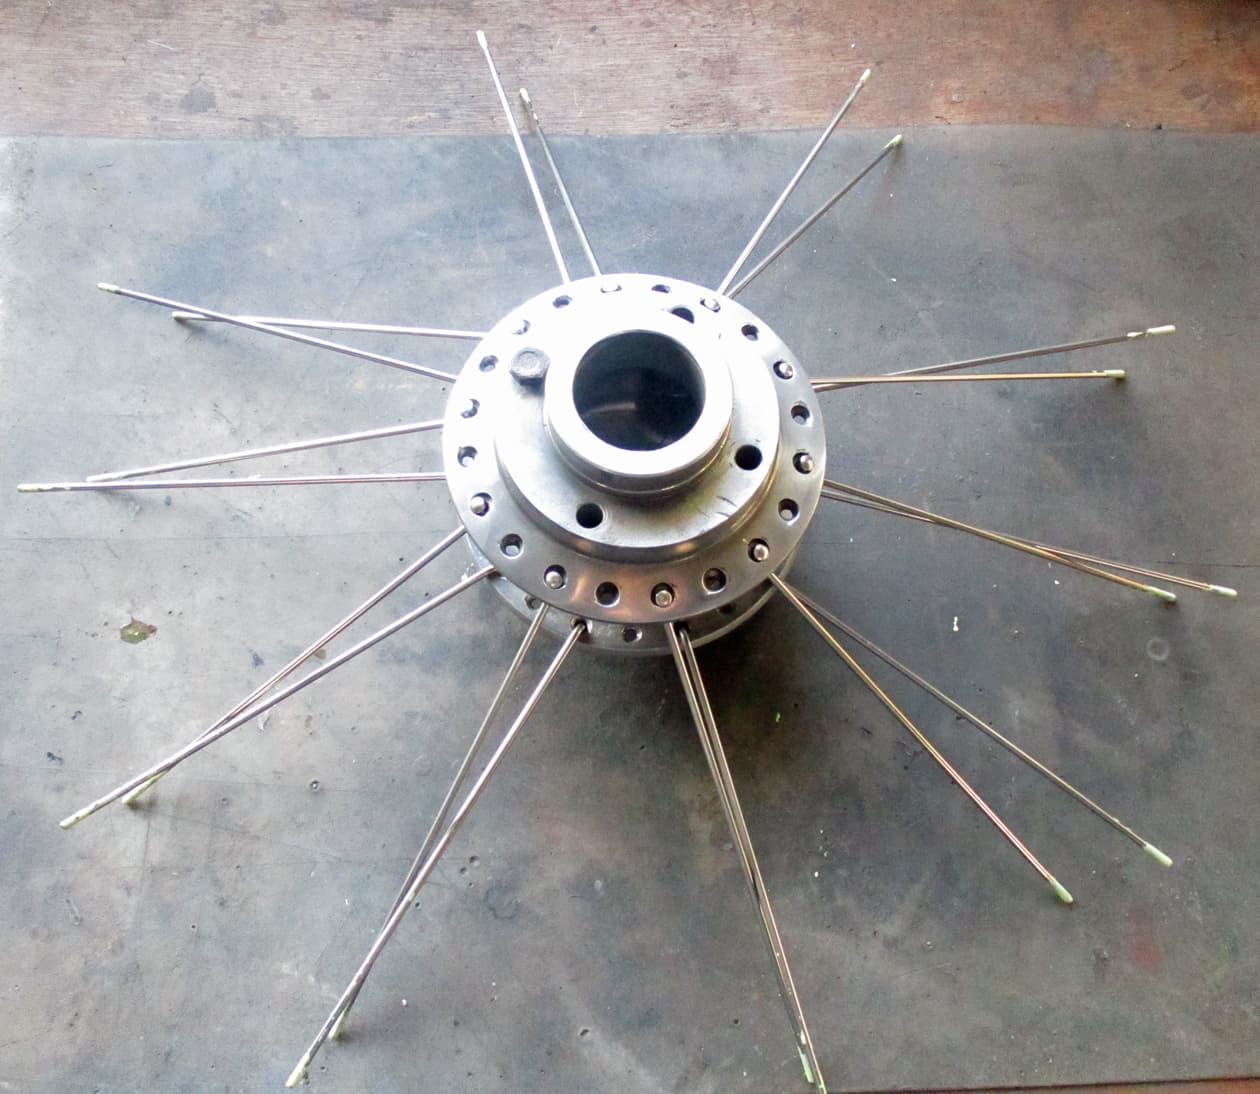
Here’s what’s needed. A 19" WM2 rim (WM2 refers to it’s width - in this case 1.85") with 40 spoke holes, 40 front wheel spokes for a 19" wheel, 40 nipples and a 2 part wheel hub.
Some suppliers, as above, supply the 40 spokes all together in a single bag, so they need sorting into inner and outer spokes.

I did a little sketch to explain. The outer spokes are bent slightly tighter than the inner spokes so that when threaded through the hub they naturally point towards the centreline of the rim.

The bends are only slightly different and are quite difficult to spot until you get your eye in. Some manufacturers are easier to spot than others. Some supplier’s spokes are all bent at the same angle but have a look to check. Separate them out into 2 piles of 20 spokes marked inner and outer.

Note how the spokes lie. There’s outer and inner spokes. This is the front wheel from another T140. Notice how the outer spokes point away (the line they take from the hub to the rim) from the wheel’s rotation. They match the tyre’s tread pattern. They point towards the loading when braking.

Here’s a photo from a different angle of anotheT140’s front wheel showing how the spokes relate to each other on each side of the hub. The outer spoke on one side of the hub is one hole in advance of the outer spoke on the other side of the hub. Yes, a bit difficult to figure that one but look at how that’s sorted:

Here’s the right side of the hub - as there’s a slot for the circlip to hold in the bearing dust cover in the centre hole.

Here’s the left side of the hub (disc side) - as there’s the screwthread for the locking ring in the centre hole.

The two halves just push together and need to held with one of the bolts. The marks from the spokes, that were in this hub, can be seen next to the spoke holes.

The bolt pushes through the hub to the other side

And the marks left by the old spokes can be seen on the other side of the hub. This marked hole is just behind the other side’s marked hole. If these don’t line up as shown then just move one side of the hub round by one bolt hole and they’ll line up as required. Phew…back shortly, dinner time ![]()
Fitting of spokes now…

As advised on here, used the Duralac stuff on the threads to stop the stainless spokes welding themselves to the nipples.

Position the assembled hub with the left (disc side) facing up. It can be done either way up, I’ve just started this way 'cause I felt like it.

The inner spokes have to go into the hub first. If the outer spokes went in first the inner spokes wouldn’t be able to be threaded in so always start with the inner spokes. Thread 10 of the 20 into the holes that don’t show marks from the previous outer spokes. Leaving a gap between each spoke.

All 10, for this side, all threaded in

Turn the hub over (try not to let the spokes fall out) and lay on the work surface.

Thread the remaining 10 inner spokes into the hub. Again through the holes with no marks from the previous outer spokes. Note how they thread into the following hole from the other side’s inner spokes.
Put it all down on the work surface and position the spokes to line up as their hub hole order alongside their neighbour.

Then push the spokes to their desired finish position in the wheel. In this case looking at the right side of the wheel.
These spokes are the inner spokes so they point in the direction of rotation. (Remember above? The outer spokes against rotation same as the tyre tread.)

Rims sometimes have a rotation marked. Normally the lettering on the right side of the rim. So place it that way round…

…over the nicely arranged hub and spokes

Place a couple of blocks of wood under the rim to bring it up to, sort of, the right level against the hub.

Notice how the holes in the rim are in groups of 4, that all point inwards towards each other. The next holes along point away from that group of 4.

Pick any of the holes in the rim as a set of 4. If looked at carefully it can be seen that the far left hole (1st) points more upwards than the next (2nd), and the 3rd hole again points more upwards than the 4th.
The holes that point upwards will therefore hold the spokes that run from this side of the hub. The holes that point downwards hold spokes from the other side of the hub.

Look at the group of four spokes here. Notice the position of the spokes that run from the closest side of the hub. That’s position 1 and 3 (counting from the lowest one in the picture.) Position 2 and 4 run to the far side of the hub.

So, therefore, the inner spoke on this side of the hub is pushed through the 1st hole in the group of 4 in the rim.

And the nipple is screwed on by hand loosely from the other side of the rim.

The inner spoke from the other side of the rim is then pushed through the 2nd hole and loosely held with a screwed on nipple.

Carry on, in the groups of two inner spokes into holes 1 and 2, all around the rim

Until all the inner spokes are threaded in. Starting to look like a wheel now ![]()
Onto the outer spokes.

Looking from the right side on another bike note the run of one of the outer spokes and how many spokes it crosses before connecting to the rim.

Hold the spoke up onto the wheel being built to confirm it’s wanted position.

Move the hub to the side of the workbench. Treat all the threads of the spokes with wizard non stick stuff. And threadle the spoke in from below.

Move the spoke across to it’s position and loosely fix with a hand screwed on nipple.

Work around the wheel and fix them all into place.

Looking, again, at another bike’s built wheel, note how the outer spokes run on the disc (left) side of the wheel. Against rotation.

Turn the wheel over on the bench and thread another outer spoke in from below.

And into the desired position on the rim.

They’ll be clear groups of 4 spokes crossing in a double X. Carry on around the wheel.

Hey ho, a wheel all spoked up. Everything loose but looking good. ![]()
It’s taken a lot longer to try and show each step in building on here than to actually do the building. Initially, it seems difficult and confusing, but follow the steps and it comes together pretty quickly and is really satisfying to do.
Insert your own hero here (Flash Gordon, Troy Tempest, Lone Ranger, Steve Zodiac, Batman, Captain Scarlet etc). The truing up will follow in the next exciting installment…
Dum de de lum lum - “anything can happen in the next half hour”…
Can someone please explain why our friend @Iron hasn’t got his own motorcycle show yet?
Once saw a show on bbc4 I think, where a guy made a wooden chair from scratch, no words just him working. It was mesmerising. But @Iron would be far better ![]()
Needs to put all this knowledge in a book. ![]()
![]()
Lacing a wheel is definitely going to keep the dementia at bay! ![]()
Thank you Gang Members. ![]()
I’m hoping that this turns into the longest single paged thread ever, assuming I finish the bike.
Once complete I’ll ask the Admin Staff to print it all off for me and I’ll bind it up into a hard cover book.
The book cover will have the forum’s emblem and the bike will be called something to link it to the forum - maybe “The Triumph Motorcycle Forum Workshop Build” or something like that (but cleverer) and included in the Blue and White paint work.
Maybe someone would like to suggest something?
The book will then be given to whoever buys the bike as I’ll be needing the money and space to start something new.
Maybe, by then, I’ll have my own TV series but I really doubt it…over, thank you, welcome ![]()
Brilliant!
Puts me to shame, I’ve only suffered GAS today…
Truly amazing work. ![]()
Guitar acquisition syndrome?
![]()
![]() ahem… maybe… maybe I need to get out in my garage more!
ahem… maybe… maybe I need to get out in my garage more!
I love seeing a wheel built, I’ve messed with mtb wheels and know the principles… but hats off to @iron what a great step by step showcase.
Thankee, ya’ll…
Before truing up can be instigated, the spindle needs to be installed. The wheel can then be adjusted either on a truing stand or by holding the spindle in a vice and adjusting horizontally.

Tighten up the nipples a bit with a screwdriver so the threaded end of the spoke can be seen - some say to bring the spoke up to the bottom of the nipple slot but I like to keep it half a dozen or so threads below that - just enough to pull the nipples onto the rim.

Looking good without any further adjustment on the left

and the right.

Here’s the bits and bobs - some renewed where required. You can see that the old bearings were the ‘open’ kind, which is why they needed the dust covers. The 1980 parts diagram doesn’t show dust covers as the bearings should be the later sealed bearings. The right side outer one is still required only as a spacer under the circlip.

Whack the spindle into some soft jaws

Apply a smidge of grease to the bearing surface and using a suitable hollow drift and small hammer tap the bearing to the lip

Check that it’s on all the way

Put the wheel - left side up - over the open vice to allow the spindle to protude below. I’ve put the internal dust cover in to maintain the spacing as the sealed bearings are the same thickness as the open bearings.

And using a hollow drift, NOT hammering the spindle, drive the bearing home. Listen for the sound when it touches the hub. Too much force will crack the lip in the hub and it’ll be well bolloxed so be careful.

Insert the locking ring and tighten up (clockwise). No need to go mad with this just nip it up.

Then on goes the lock nut. Again no need for it to be tight until the other side of the spindle is done

Turn the wheel over and install the bearing with a suitable hollow drift. The bearing only needs to go in far enough to allow the outer dust cover and circlip to be installed. The circlip is better seated right up onto the dust cover or it’ll rattle. So, again, take it slowly.

Install the dust cover

And finally, the circlip. make sure it’s seated by pushing it around in it’s slot with a screwdriver. I had to install the old circlip as the new one was too thick to slip into the slot. Bugger.

Turn the wheel over and tighten the lock nut. Give the wheel a jolly good spin. I can see that adjustment is required as it’s moving laterally about a quarter of an inch. It could be trued up where it is in the vice but I like using my truing stand 'cause it looks like I know what I’m doing when anyone visits. So that’ll be next then…over…
I’ve probably mentioned this before but I have a CB250 K2. The wheels have polished up pretty well but they do still have quite unsightly pits of rust. However, the wheels and spokes do seem to be structurally sound. I was 50/50 on buying new rims and spokes or using the wheels as they are. Your demonstration has convinced me not to venture into the (to me) dark art of wheel building. I know it’s a piece of piss to you but it scares me. I doff my hat to you.

If the wheels are still together and look ok then leave well alone.
I’ve heard people saying they’ve replaced the spokes one by one but I’m not sure if that is actually possible due to how they thread between each other and the way they join to the hub. (I’m pretty sure it’s not).
If the rims and spokes are already apart then there’s no problem with just ‘having a go’ - it’ll just be time.
Devon Rim and Feked, amongst plenty of others, have a wheel building service that’s not too expensive although you probably have to buy their rims and spokes along with getting your hubs to them.
I really had no choice with the existing wheels on this and I wasted money getting the rims vapour blasted for them to be binned. Scarey too, but I’ve learned and, most importantly, enjoyed myself. And you know the best bit? When someone asks if I built it…
Iron, you are an artist and an inspiration. Thank you for detailing this rebuild.
Rims and spokes are intact so i’m definitely leaving alone. ![]()
It’s a bit chilly in the garage but I’m a bit full of chocolate things and the actual postman appeared with some more spares.

Set up the wheel lacer thingymajig. I like this one as all the bits bolt on separately…

so it can be levelled up wherever it’s been put. No point if the top isn’t perpendicular to the upright as the pointer will be off.

One of these is required to turn the nipples. This one’s ok for a range of sizes.

As the spindle is already in the front wheel (the cone shaped locks on the jig’s spindle wouldn’t fit into just the hubs anyway) then the jig can be set up narrower to take the wheel size. See, down there for dancing ![]()

Three things to think about - above, how much the rim wobbles from left to right in relation to the pointer

How much the rim moves up and down in relation to the pointer (when the pointer is moved to the inside of the rim)


And where is the edge of the rim in relation to the hub using a long straight edge held against the two rim edges.
When carrying out any tightening or loosening of all nipples around the rim always start at the valve hole in the rim or you’ll forget where you started and then where to finish.
Start by using a screwdriver to nip up all the nipples around the rim. get them so they all feel about the same torque but not so tight that you can’t use the screwdriver to turn them.
You’ll be quite surprised how close the wheel runs just doing this first.
Then just concentrate on the left to right wobble. Where the section of rim is closest to the pointer ,when the rim is spun, tighten the nipples on the spokes in that section that will pull the rim away from the pointer. Only tighten every other spoke that will pull the rim to the opposite side of the hub.
Tighten the nipples by a quarter to half a turn each. Then spin the wheel again and check.
Obviously the rim can be pulled closer to the pointer by tightening the nipples on the spokes that will pull the rim closer to the pointer.
A bit of patience as it’ll take half a dozen goes before the rim starts to get into a pretty good line against the pointer.
Once the wobble is hardly noticable (There’s always a bump where the rim has been welded) move onto the rims up and down movement.
Where the section of rim is closest to the pointer that section needs to be pulled away from the pointer or the opposite side of the rim needs to be pulled closer to the pointer.
Work in the sections opposite to each other to tighten and loosen the spokes to pul the rim closer or away from the pointer.
Again it’ll take a few goes before the rim shows that it’s running pretty well.
Now use a straight edge to make sure the rim is running where you want it in relation to the hub. This is a T140 front wheel so it needs to be central.
As the wobble is almost gone it’ll be easy to see which way the rim has to move (if any). Loosen all the spokes that the rim has to move away from and tighten all the spokes that the rim has to move towards. That’ll be loosen every other spoke and tighten every other spoke depending on it’s direction to the hub. Only loosen or tighten by a quarter of a turn before alignment is checked again with the hub.

Do all the above two or three times again to get the wheel running as true as you can. It takes a bit of time but patience will pay off in the end. I’ll have another look at it tomorrow before I start the back wheel as I may want to just fettle that a touch more… ![]()