Looks good from here
2 Likes
Do you need a special mask for 2 pack or is that for a different kind of paint?
Looks lovely, does that!
1 Like
Yep, @AdieP proper mask required for 2 pack paints

Part time painter masks, as above, are ok - full time booth workers need air fed masks. Isothermawhatsit paints lead to asthma pretty quickly. Even when finished spraying make sure the garage/shed/kitchen is cleared of spray mist before taking the mask off.
In the days of cellulose I used to have to get out of the garage because I got so dizzy. Blimey ![]() Advice is to buy a decent mask and wear it when spraying anything, even water based through an airbrush.
Advice is to buy a decent mask and wear it when spraying anything, even water based through an airbrush.
4 Likes
Awaiting bar stock for the other things so thought I’d be getting on with this thing.

Eventually found the stuff I’d lost due to thinking about other things. While removing the masking from the swingarm bushes I actually got my finger properly stuck in the hole. Good job the oil can was nearby. Proper stuck it was, would’ve looked stupid up A&E with a swingarm dangling, silly arse.

Inserted new nipples

And I bloody knew I had got these new rubbers. Took me a second look everywhere to find them, and they weren’t there anyway. I must get something sorted for the stash.
I thought I’d reamed the new bushes out so the bobbins would slip in. But no…cause they didn’t

So, into the vice and get the 1" ream through them.

Put the inner rubber covers onto the frame first.

Then the bobbins into the swingarm and the outer rubber covers

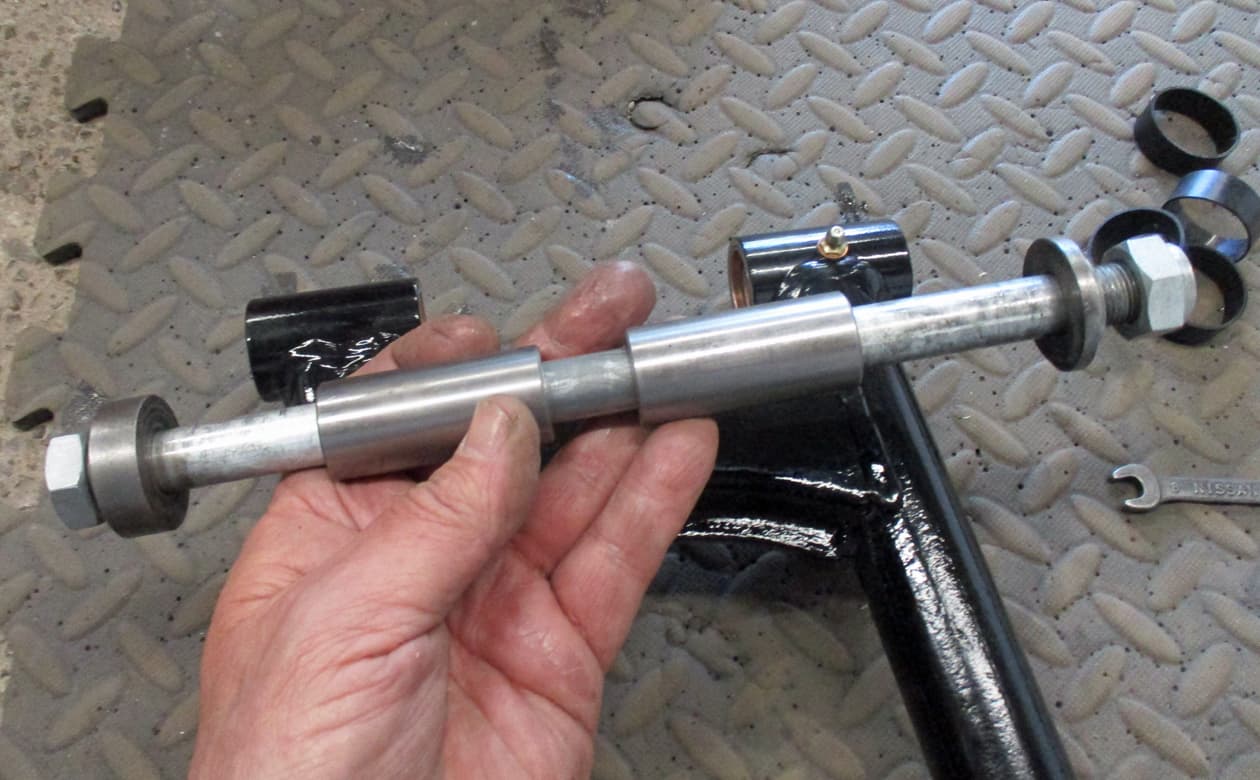
It’s a bit of a fiddle getting the swingarm inside the rubber covers but a good session of swearing soon sorts that out. Slip in the swingarm bolt with the wide spacer on the left and the thin spacer on the right. Then fenagle the rubber covers into place so they’re sitting nicely over the joins.

Get the grease gun onto the nipples (the right side is on top and the left side underneath)

Drop the swingarm down to allow access to the bottom one and fill the bushes until grease can be seen coming out of the rubber covers.

Drop in the nice new shocks and mounting bolts and we’re away. Jolly good ![]()
9 Likes
Wheels etc are all done (other than the tyre change)

So whack the back one in, along with the brake stay

Install the remodelled and painted yokes

Loads of grease on the new headstock bearings.

Top and bottom. Not forgetting the dust cover over the top.

In with the yokes, then slot the forks into the yokes and the nice new Western bars onto the solid inserts.

Nice new return spring and bolt into the kick stand. Use the kickstand as a lever to pull the spring before trying to get the bolt in.

have another inspection of the fork’s bottom plates that secure the front spindle. (I’ve removed the mudguard fittings on both). Overtighening can cause the plates to crack, and we don’t want that do we?

And it’s back on it’s feet again. Yay…thank you, welcome, over… ![]()
14 Likes
Great work, @Iron !
3 Likes
Another masterclass @Iron ![]()
3 Likes
Lots of repainted black bits to get back on

Battery tray, coil tray, back brake sorted, footpegs, engine plates all bolted into place with new shiney nuts and bolts. Couldn’t get the placement of the brake fluid reservoir right as the outlet points at a weird angle. So gave up on that and have ordered a normal round one.

Just placed the tail and tank on and looked at it while drinking tea. It’s come on a bit. ![]()
12 Likes
Yeah it has.
2 Likes
Beaut!!! ![]()
![]()
![]()
3 Likes
It is looking very smart….
3 Likes
After a major clean up of the garage (blimey, it really needed it, it took two whole days) and a few other bits to sort out.

There was sanding of primer, painting, sanding etc etc on and on

Till all tins were looking very alaskan white.

Masked up a piece of cut off mudguard to check what blue and pinstripes

Still undecided as I’m not sure about metallic. Hmmmmm…
11 Likes
Faffed around with other ideas and eventually opted for metallic blue with no pinstripes

Looks nice in the sun

All tins done

And just had to 'rest’them on the frame to have a look. Just lacquering to do. Pleased with that, thank you, welcome, over… ![]()
13 Likes
You should be, it looks great!
2 Likes
That is looking really good and tasteful!
2 Likes
If that was a magazine, it would be on the top shelf in a plain wrapper😍
2 Likes
@Iron … you talented bugger, I am quickly running out of caps that I can doff!!!

3 Likes
Thank you all

Lacquering done, waiting to cure then polishing.
It’s now Engine time, so started sifting through the boxes of bits to see what’s there, if it’s any good and what’s missing,

I’d normally be dismantling the engine, checking each part, making a list to order parts or keeping in a labelled bag.
But as I don’t know if all the parts are there - I have a good idea as I’ve done a fair few of these engines but, a parts catalogue is essential.
A parts catalogue is fine when needing a couple of bits to get the parts number. But in this case I used it as a check list. Triumph parts catalogues aren’t the easiest to read and are just wrong in places. Haynes manuals are just useless for this task but having one to hand doesn’t hurt.

I’m obviously starting at getting the crankcases together. They are confusing enough but there’s also the crankshaft, conrods etc which is covered on another diagram

But all the gearbox bearings need to be obtained to allow the crankcase halves to go together. So refer to this one as well

It gets a bit confusing so writing a list and searching through rusty parts takes ages. But I think I’ve got everything sorted to order.
Then the parts need to be sourced. There’s a few good quality dealers but they never have everything needed. Several dealerships will usually cover all the parts needed. Waiting for a missing part is frustrating but risking a cheap part from abroad or ebay can prove a waste of money.
Any old end up. I think I’ve got all the parts needed to allow the crankcase halves to be assembled. All together it’s been around £750 today. There’s still barrels, pistons, top end, clutch etc to go which I’m expecting at least another £1250 for parts before the engine is complete. But we’ll save that for another day and see if the crankcases bolt up nicely first.
Fingers crossed ![]() Thankyou, over…
Thankyou, over… ![]()
16 Likes
A few pieces arrived, so let’s fit the main stand.

New spring to fit. These are pretty strong and are a bit of a bugger to lever on so there’s a different way.

Equipment required is a scissor jack and a selection of washers. Some people use coins but I find washers are easier.

Hook the spring into the jack. Make sure it’s in porperly as you don’t want it slipping off and sproooging around tthe garage bouncing off the walls trying to take your ears off.

Have an idea how long the spring needs to be to slot straight over the hooks on the frame and main stand easily. Wind the jack open to extend the spring to the required length.

Delve into the washer box and push them into the gaps now created in the spring. Washers need to be inserted on two sides of the spring or it will curl over when released. I’m a bit windy doing this bit, just in case the spring sprungs and shoots washers into forehead causing a visit to A&E. So take your time and don’t push the washers in too hard, just enough for them to be held.

And here it is all full up with washers.

Undo the jack and the spring will stay extended. Position where it’s wanted and adjust spring length by adding or removing some washers as required. Just wang it back into the jack to make the additions or subtractions of washers.

Once it hooks over securely then a screwdriver inserted into the washer’s holes can lever the washers out. This is where coins are a bit more difficult to get out, unless it’s Chinese wonga, as there’s no holes to stick the screwdriver in.

You end up with a garage floor strewn with washers that’ll be found over the next few weeks. But it’s been fairly effortless and there’s no injuries trying to lever or pull the spring on.

Sorted. Fitted the back light and a new number plate.
Note that the number plate is yellow with black lettering rather than my usual black with silver lettering.
Any vehicle manufactured after 1st January 1980 now requires a yellow number plate.
It used to be any vehicle after 1973 but when the historic V5s came in it was any vehicle less than 40 years old. It was changed a year or so ago so be aware.
Plod don’t usually get too anxious over size on vintage stuff unless it’s those Heddlu tossers but that’s easily solved.

Main stand all working. Thank you, welcome…over ![]()
13 Likes
Up there for thinking… Genuis.
3 Likes